10 Day Namibia Itinerary: A Realistic Self-Drive Guide

Planning a 10 day Namibia itinerary is slightly chaotic, purely because Namibia is massive. If you try to cram in too many stops, you’ll spend most of your trip watching the landscape go by through a dusty windscreen.
We spent 25 days in Namibia (22 of them living out of a 4×4 camper), and we still didn’t make it everywhere! We didn’t even get to the Caprivi Strip, which I’m still mildly heartbroken about.
We also learned pretty quickly that drive times can be… character building. One day that looked like a 5-hour drive in theory turned into 8 once we were actually out on the roads.
If you’re doing Namibia for the first time and you’ve only got 10 days, here’s the good news: you can still see the stuff you came for. The bad news: some of the drives are long, but you can’t avoid that, no matter how long you’re here.
So here’s the route I’d recommend for a first time self-drive: Sossusvlei, Etosha, Spitzkoppe, and Swakopmund. It’s built for travellers who want the iconic highlights without moving location every single day.
Below is a self-drive plan with realistic drive times and where to stay (camping + lodges), including where to base for Sossusvlei, the Etosha gate that makes the most sense, and a Skeleton Coast detour that’s still doable even if you’re short on time.
Road Trip Itinerary at a Glance
- Day 1: Windhoek
- Days 2–3: Sossusvlei & Deadvlei
- Days 4–6: Swakopmund & the Skeleton Coast
- Day 7: Spitzkoppe
- Days 8–10: Etosha
Total distance: Approx. 2,000 km
Quick reality check: Namibia’s size isn’t the problem… the roads are. Even when a drive doesn’t look wild on the map, it can feel tedious (and take longer than you’d expect), especially once you’re off the tar roads.
Day 1: Land in Windhoek
Windhoek is where your Namibia trip begins. If you’re arriving late (or you’re literally running on fumes), I’d leave the vehicle pickup for tomorrow. You’ll be more awake for the handover, and it saves you paying for a day you don’t really get to use.
Use today to get yourself organised, because this is the easiest place to do a proper stock-up before you head into the desert. Make sure you grab plenty of snacks, as tomorrow is a big drive (it will be pretty though).
We found that Checkers were best for value, and the one at Hidas Centre has an Asian supermarket upstairs that makes its own tofu and tempeh (we’re vegan, so we were super happy about this!).
For dinner (and lunch if you’re there early enough), Windhoek has loads of great places, our faves were Seoul Food, Olivia’s Kitchen, and Indus, which are all delicious with great plant based options.
If you’ve still got a functioning brain cell after the flight (I certainly didn’t!), you can do a quick wander past Christuskirche, check out the Independence Memorial Museum, or go sit somewhere pretty with a drink (hello, Balcony of Love).
And if you don’t have your vehicle yet, Yango is an app like Uber for Namibia.

Where to Stay
Campsite: Urban Camp
Urban Camp is an easy, comfy first-night option in Windhoek. You can book a regular campsite, or one of their glamping tents if you don’t have your camper yet.
The facilities are ridiculously good: there’s a pool, a bar with vegan food (huge win), and the bathrooms were honestly some of the nicest we had all trip.
Accommodation: Chic City Flat
We stayed here at the end of our trip, but it works perfectly at the start too. It’s a one-bedroom apartment with a washing machine, a balcony, and access to a pool.
Days 2–3: Sossusvlei & Deadvlei
🚗 Drive time: 6 hours
🛣️ Roads: Tar & gravel
⚠️ Tip: Download offline maps as signal disappears for chunks of this drive
Day 2: Pick Up Camper & Drive To Sesriem
Pick up your camper as early as you humanly can today. Getting to the Sesriem/Sossusvlei area is roughly 6 hours.
The most common route is via Rehoboth on the B1 (nice, easy tar), then toward Solitaire (C24), where you’ll hit gravel, and over Spreetshoogte Pass (D1261/D1275). It’s a stunning drive, but fair warning: the last stretch into Sesriem is very bumpy, so expect a bit of rattling.
If you’re deciding whether to stay inside the park, it’s pricier, and you’ll still pay the daily park fee (around 150 NAD / £6.84 per person per day), but it makes the whole sunrise/sunset thing so much easier.
You get access one hour before sunrise and one hour after sunset, while everyone staying outside is stuck waiting at the gate. That head start is so worth it, and it was also the only time our rental company was okay with us driving in the dark, so we could actually be in position for sunrise.
And if you’re not completely wiped when you get into Sesriem, Elim Dune is a low-effort win, it’s about 10 minutes away from the gate, and it’s a really lovely, quiet place for sunset with a drink.

Day 3: Sossusvlei & Deadvlei (Dune 45, Deadvlei + Big Daddy)
Today is your full Sossusvlei day, and there are 3 main sights people come for: Deadvlei, Big Daddy, and Dune 45. You can mix and match them however you want, but if you’re doing any dune climbing, you’ll thank yourself for keeping them to early morning or later afternoon.
Most people do Dune 45 at sunrise because it’s the easiest/closest dune to reach from the gate, but we actually went for sunset instead, and it was gorgeous. Fewer people and way less chaotic.
If you’re planning to climb Big Daddy, that’s the one I’d do at sunrise. It’s cooler, the sand is less brutal underfoot, and you’ve got a better chance of making it to the top without feeling like you’re melting.
We tried doing it after Deadvlei and got instantly humbled! It was already around 30°C, the wind was completely unhinged, and halfway up, we were basically being exfoliated by flying sand.
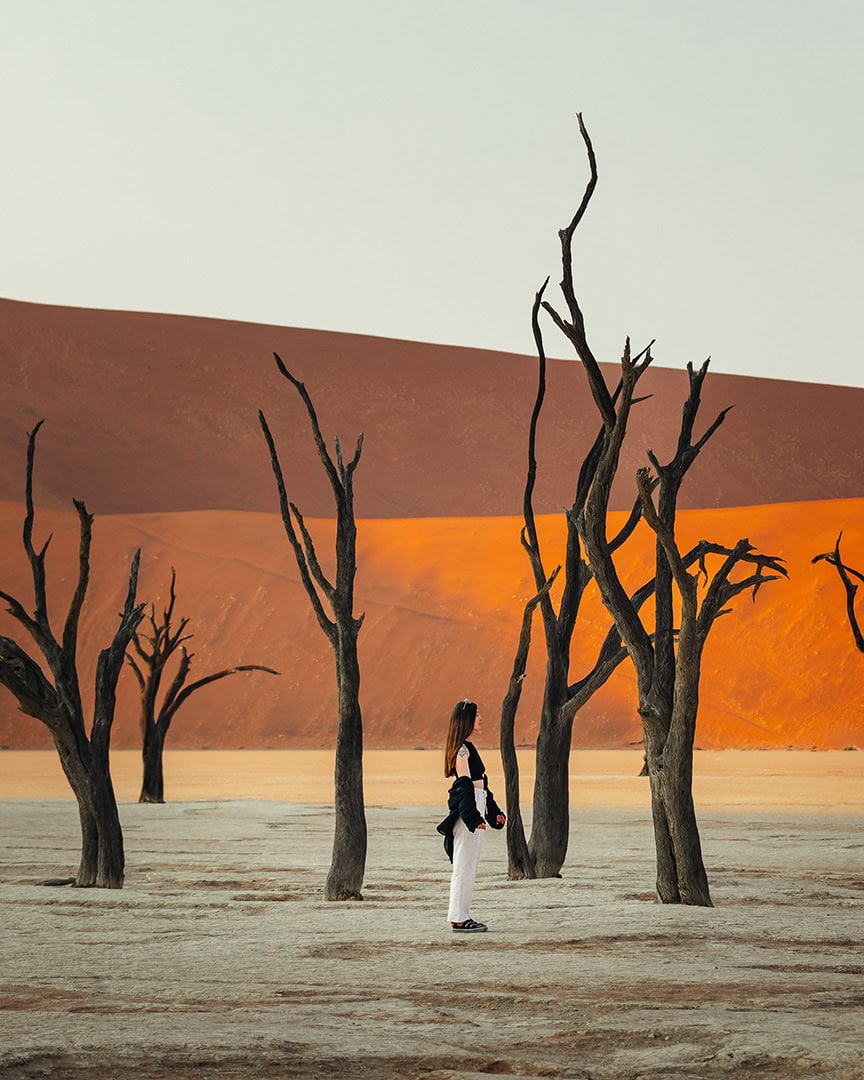
I’d wanted to see Deadvlei for years, and it felt unreal in person. The dead trees frozen in time in the white clay pan, surrounded by golden dunes, it’s just beautiful. If you do Big Daddy first, you can drop straight down to Deadvlei afterwards.
One important logistics thing: getting to Deadvlei/Big Daddy involves a deep sand track. It’s 4×4 only, and once you’re on it, you don’t really want to stop. Keep your momentum, otherwise you risk getting stuck.
Before you head in, stop at the Sesriem petrol station just outside the gate and drop your tyre pressure. The guys there were so lovely, helped us sort it, and pumped them back up afterwards.
If that all sounds like your personal nightmare, there’s also a shuttle from the car park (around 260 NAD / approx. £11.90pp), and it’s genuinely the easiest way to do Deadvlei and Big Daddy without the stress.

Where to Stay
Camping (inside the gate): Sesriem Campsite (NWR) or Oshana Camp
We stayed at Sesriem Campsite (NWR) and were pleasantly surprised: roomy pitches and lots of shade. The facilities are basic but fine (clean enough), and there’s also a freezing pool, plus a bar/restaurant for when you can’t face camp cooking.
Oshana Camp is just behind and feels newer, with private ablutions and kitchenettes. Next time, we’d probably stay there, and you still get access to the main NWR facilities either way.
Accommodation: Desert Quiver Camp (outside) or Sesriem NWR rooms (inside)
If you’re not camping, it’s basically inside vs outside the gate: outside is usually better value, inside is worth it for easy sunrise/sunset access.
Desert Quiver Camp (outside) has stylish private units with outdoor kitchens, desert views, and a pool/bar. Sesriem NWR rooms (inside) are the most budget-friendly way to stay within the gate — not fancy, but the location is the whole point.
Days 4–6: Swakopmund & The Skeleton Coast
🚗 Drive time: 6 hours
🛣️ Roads: Mostly gravel
⚠️ Tip: Top up at the Sesriem petrol station before you leave
Day 4: Drive To Swakopmund & Stop in Solitaire
Okay, today’s another big drive day. Maps will tell you it’s about 4.5 hours, but don’t be fooled, once you’re past Solitaire, the gravel road can be pretty shocking.
When we did it, it was rough enough that it added an hour and a half to our drive time, so pad your schedule a bit. (If the roads have been graded recently, you might get lucky and it’ll be smoother.)
Solitaire was such a happy surprise. We were fully prepared to eat something tragic out of the camper, then discovered the café had two vegan meals. TWO. I was so happy! I had the curry, James had the vegan burger, and both were delicious.
Plus there are these adorable little mongooses roaming around, I 100% thought they were meerkats at first.
The drive after that is actually really pretty with twisty canyon roads, then dunes start creeping back in again as you head towards Walvis Bay. And then you arrive in Swakopmund, with proper roads, cafés, sea air, and this very German coastal vibe.
Keep the afternoon chilled and go straight to Slow Town Roasters for coffee (I really liked their iced latte with oat milk!). The WiFi there is decent, so if you need to upload photos/videos, this is your moment.

Day 5: Sandwich Harbour Half Day Tour
You’ve probably seen Sandwich Harbour all over socials, and why wouldn’t you, I mean, look at it! It’s the spot where the dunes literally drop into the ocean, and it’s only accessible on a 4×4 tour, so you’ll need to book a half-day trip from Swakop.
You can usually choose AM or PM. We did the PM tour because mornings were cold and pretty grey when we were there, and the afternoons perked up (this changes with season, but it worked perfectly for us).
Most tours also include a trip to see the flamingos in Walvis Bay and a stop at the pink salt lakes, and then on to the dunes. I could not believe how tall and steep some of them were, and we were just driving down them!
Use the other half of the day to just enjoy Swakopmund. Wander, shop, sit in cafés, do absolutely nothing urgent. It really is a lovely town, and we enjoyed just walking around.
We loved Wild Rocket Café for brunch/early lunch. They had this really good sourdough, and we basically turned it into a DIY feast with smashed avo, grilled mushrooms and rocket. Sounds super simple, but the ingredients were so fresh!
And if you’re in the mood for a sundowner, head to Tiger Reef Beach Bar & Grill. It was freezing when we went, but they had the fire pit going, and you could sit there looking out over the ocean.

Day 6: Drive the Skeleton Coast
Today you can go at your own pace. We drove up the Skeleton Coast as far as Cape Cross Seal Reserve, and it took us about half a day all in.
The Skeleton Coast is famous for its rough waters, and you’ll see shipwrecks dotted along the drive. We also spotted whale bones in a few places, which is where I guess the coast gets its name from.
Cape Cross is absolutely worth it. I’ve never seen so many seals in one place in my life, BUT bring something to cover your face. Scarf, mask, whatever. The smell is honestly worse than anything I’ve ever experienced! I was gagging so much that a woman came over and offered me balm to put under my nose.
Entry to Cape Cross Seal Reserve is 150 NAD per person (about £6.84) plus 50 NAD (about £2.30) for the car.
On the way back to Swakop, if you haven’t been yet, do Garnish for dinner. It’s proper delicious, super vegan-friendly, and exactly what you want after a day of wind, fog, and seal chaos.

Where to Stay
Camping: Tiger Reef
Tiger Reef was our base, and it’s such a nice spot if you’re camping. You’re basically right on the waterfront, so you fall asleep to the waves. It’s not fancy, but the bathrooms were genuinely great for camping standards; clean and hot showers.
Apartment: The Nautical Nook
If you’re ready for a proper bed (and a bit of a reset), The Nautical Nook is a great base in town. It’s central, has free parking, and a kitchen, perfect if you want a couple of easy nights cooking for yourself instead of eating out every meal.
Day 7: Spitzkoppe
🚗 Drive time: 2 hours
🛣️ Roads: Mostly tar (a rare treat)
⚠️ Tip: Try to get a campsite around 9–11 if they’re free, they’re best in my opinion
Today is a much shorter drive day, and you’re honestly spoiled because most of it is tarmac! Before you leave Swakopmund, swing by a supermarket and stock up properly. Spitzkoppe is remote, and there’s nothing out there once you arrive. Same for fuel: top up while it’s an easy win.
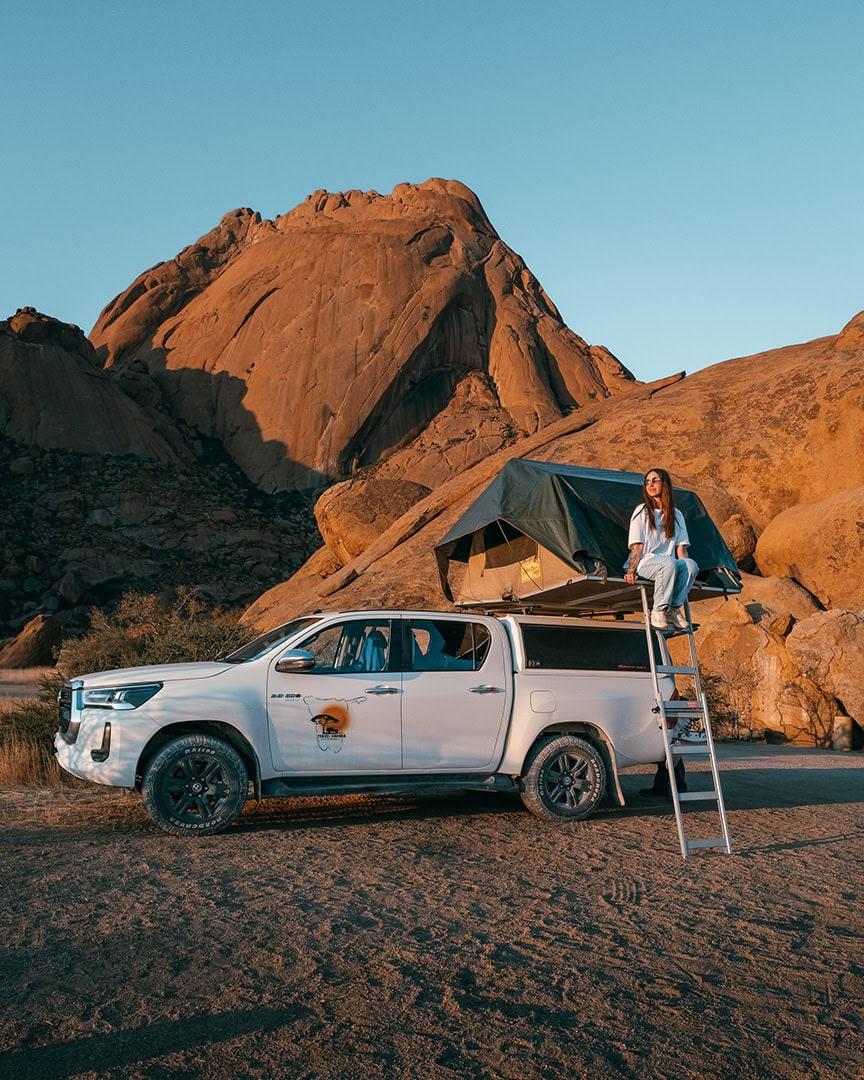
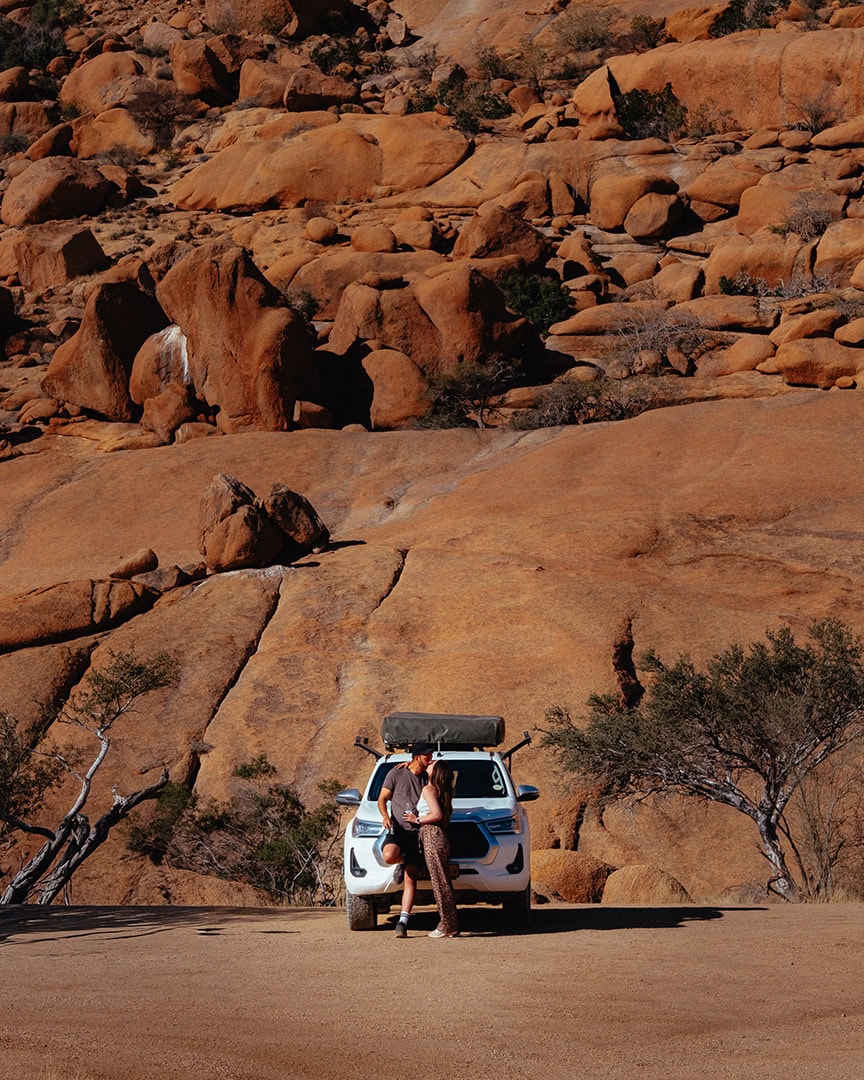
I loved Spitzkoppe. Like a lot of Namibia, it’s just so unique. It’s these huge orange granite mountains rising out of nowhere.
When you arrive, your first job is grabbing a campsite because it’s first come, first served. Have a little drive around and see what’s free. I thought the spots around 9–11 were the best, but go with whatever feels right for you (and what’s actually available).
To claim an empty spot, the etiquette is to leave your table and chairs out so everyone knows it’s taken.
Once you’re set up, head to the rock art. There are two options: Bushman’s Paradise and Little Bushman’s Paradise. You’ll need to go with a guide (they’re usually waiting in the car park) and tip them for their time.
Bushman’s Paradise has a short but steep climb up the rocks to reach the art, whereas Little Bushman’s is right next to the car park if you want the easy option.
For sunset, the rock arch is a great spot, the views over Spitzkoppe are gorgeous, and it’s such a nice way to end the day.
And honestly, my favourite part here was just being at camp. The light on the rocks is beautiful. We lit a fire, had a couple of drinks, and did absolutely nothing except relax. Then the stars came out, and we could see the Milky Way above us. It was unreal.
Where to Stay
Campsite: Spitzkoppe Rest Camp
This is where we camped, and it’s such a good setup. Every pitch comes with its own dry toilet and a fire pit, so you’re nicely self-contained.
Then up by reception, you’ve got the “proper” facilities, so hot showers and flush toilets, just bear in mind it can be a 10–15 minute drive from your site, depending on where you end up.
Accommodation: Spitzkoppe Cabin Camp
If you’re not camping, the Spitzkoppe Cabin Camp is a really lovely alternative. The cabins are tucked right in among the rocks, so you still get that “middle of nowhere” vibe without sleeping in a tent. Each one has a little outdoor space, and there’s a shared bathroom block close by.
Days 8–10: Etosha National Park
🚗 Drive time: 5 hours
🛣️ Roads: Tar & gravel
⚠️ Tip: Enter Etosha via Anderson Gate and ditch any plastic bags before you get there
Day 8: Drive to the Anderson Gate & Explore Okaukuejo
Today you’re heading to Etosha via Anderson Gate (about 5 hours), so aim for an early-ish start. From here, you’ve got 2 options: stay around Okaukuejo, or overnight there tonight and cross the park tomorrow to Namutoni.
At the gate, you’ll pay your park fees: 150 NAD per person per day (about £6.84), and it covers 24 hours from the time you enter. They’ll also check your car before letting you through, as you’re not allowed to bring in plastic bags or drones.
Once you’re in, do a late afternoon loop near Okaukuejo before sunset. We had stupidly good luck near the Okondeka waterhole. It was just us and one other car.
We could see the guy next to us getting all excited and grabbing his binoculars. We were squinting trying to see what it was, and then I zoomed in on my camera and saw them… two lions getting up out of the grass and casually wandering over. Genuinely unreal.

Where to Stay
Where you stay comes down to one question: do you want a waterhole at camp or nicer facilities?
Okaukuejo (inside the gate) has campsites and rooms, and the big bonus is the camp waterhole. Etosha Village (outside the gate) has nicer facilities, but it’s camping only, and there’s no waterhole on site.
Day 9: Explore Etosha At Your Own Pace
You’ve got 2 options today, depending on how you want to pace Etosha (and how many hours you want to spend in the car).
Option 1: Base yourself at Okaukuejo
Do a few drives out from Okaukuejo, stop wherever looks promising, and loop back when you’ve had enough. This area is where we had our best luck with big cats and rhinos, but the animals in Etosha don’t exactly stick to zones, so treat that as “what worked for us,” not a promise.
Popular waterholes in this area are: Nebrownii is great for elephants, the Okaukuejo camp waterhole is known for rhino sightings (we saw a black rhino near here), and Okondeka is where we saw the lions.

Option 2: Cross the park to Namutoni
If you want to explore further into the park, you can make your way across to Namutoni (it’s about 3 hours without stops… but obviously you’ll be stopping constantly).
There are waterholes all along the route, so it turns into a very satisfying cycle of drive → stop → watch → repeat, and the bonus is you’ll be set up to camp at Namutoni tonight.
This side is where we saw an actual ridiculous number of elephants, I’m talking around 40 in a few minutes. I was so happy.
On the way, swing through Halali and do the small detour to Moringa waterhole. Sightings are never guaranteed, but it’s one of the more active waterholes, so you’ve got a decent chance of something good.
You’ll also pass a couple of gated picnic spots, which are perfect for a quick leg stretch and snack break.
And once you’re closer to Namutoni, make time for Tsumcor and Chudop waterholes. Tsumcor felt busy every time we pulled up, and at Chudop, we watched a smaller elephant group having the best time splashing around.
One of them was clearly not ready to leave when the others started moving off.

Where To Stay
If you are staying in Okaukuejo again, then stay at the same place tonight.
If you cross the park to Namutoni, stay at the Namutoni NWR. They have both campsites and accommodations for you to choose from. They also have a waterhole where we saw loads of elephants.
Day 10: One Last Etosha Drive & Back to Windhoek
If you can drag yourself up early, do one final loop around Namutoni or Okaukuejo (wherever you ended up staying). Mornings are the perfect time for sightings, and it’s such a nice way to squeeze in one last Etosha moment before your 10 days in Namibia comes to an end.
Then it’s time to head back to Windhoek. From Namutoni it’s roughly 5.5 hours, and from Okaukuejo it’s around 4.5 hours (give yourself a bit of wiggle room, the roads are mostly tar, but you might hit traffic as you get back into Windhoek).
When you exit the park, your vehicle will be checked again, they’re making sure you’re not taking meat out of Etosha. Not exactly an issue for us as vegans, but if you do eat meat, just know that anything you’ve got in the car can be taken off you.
And finally, it’s time to drop off your camper/vehicle.

What to Book in Advance
Namibia might not feel as “mainstream” as some other destinations (which is honestly part of the charm, I hope it stays this way), but things still sell out fast, especially in the peak months, so it really pays to plan ahead.
Book ASAP: 4×4 & Key Campsites
Start with your vehicle. We booked our 4×4 6 months before our Namibia trip, and even then, we couldn’t get a manual, so the earlier you book, the more choice you’ll have. We booked with Travel Namibia 4×4 and they were amazing!
Next: campsites and accommodation. The popular ones (especially inside Etosha and inside the Sossusvlei/Sesriem gate) get snapped up quickly.
We planned our route first, then booked campsites a few months out, and I’m glad we didn’t leave it any later.
Peak Season = Don’t Mess About
If you’re travelling in the dry season (April/May to October), you’ll want to be a lot more organised.
And if you’re going in June, July, or August (peak peak), book as much as you can in advance, vehicle, the big-name camps, and pretty much anything you’ll be gutted to miss.
What’s Usually More Flexible
Tours and activities can sometimes be booked closer to the time. We booked most of ours just a few days ahead when we visited in late August and through September, and it was fine.
But if you’re going in June–August, I wouldn’t risk it. You’ve gone all that way, so it would be a shame to miss out.
Self-Driving in Namibia Tips
Self-driving Namibia is so worth it, you just need a few habits that stop the long days from turning into unnecessary chaos.
Gravel roads & speed
Gravel is what slows you down. A lot of roads are signed at 80 km/h, but depending on the condition, you’ll often be doing way less than that. Build buffer time into your days, as a “4.5 hour drive” can turn into 6 very easily when the gravel is rough.
Tyres + punctures
Check what your vehicle comes with before you set off: you want at least one spare tyre (ideally 2 if you’re in a 4×4/camper) and a jack you actually know how to use.
We were lucky and didn’t get a puncture, but not having a spare is the kind of problem that ruins your day fast.
Fuel & distances
During our trip, we topped up fuel at pretty much every stop, even when it felt unnecessary. Most campers come with two 80L tanks, but the distances are big, and you really don’t want to be gambling on range in the middle of nowhere.
If there’s fuel and you’re passing it, just fill up.
Avoid night driving
Most camper rental insurance won’t cover you driving after dark, and even if it did, it’s not worth it. Wildlife is more active, visibility drops, and hitting an animal on a gravel road is the nightmare scenario. Aim to arrive before sunset.
Offline maps & signal
Expect stretches with no signal (sometimes for hours). Download offline maps in advance and keep your key routes saved.
Stock up towns
Do a proper stock-up in Windhoek and then again in Swakopmund. There are small shops around Sesriem/Sossusvlei and at the Etosha camps, but they’re limited and more expensive.
Fine for basics, not great for a full re-supply.

What to Pack for Namibia
Namibia packing is less about looking cute and more about being comfortable and prepared (although you can still look cute!).
You’ll go from hot, dusty days to proper cold desert nights… I slept in my coat more than once!
Things I genuinely wouldn’t skip:
- Layers for evenings – the temperature drop is no joke, I was so surprised by how cold it got.
- Windproof/waterproof jacket – the wind can be savage (and Swakopmund can feel cold).
- Headlamp – I didn’t pack one, and James ended up holding my phone torch while I tried to pee. Humbling.
- Binoculars – we probably missed so much in Etosha without them.
- Sunscreen – the sun is so strong, and you’ll be outside in the day a lot.
- Insect repellent –no one wants to be covered in bites.
Places to Add if You Have More Time
10 days in Namibia is a really good chunk of time, you can see some of the absolute best spots without turning the whole trip into a blur of gravel roads.
But Namibia is massive. We spent 25 days there and still didn’t see everything (we didn’t even make it to the Caprivi Strip, which I’m still not over).
If you’ve got extra time, one add-on I loved was Kolmanskop, an abandoned diamond mining town that the desert is slowly reclaiming. It’s super eerie.
Another one I’d seriously consider adding is Damaraland, especially if you want the chance to see the rare desert elephants.
And if you’ve got proper extra time (and you’re up for going further), heading northeast into the Kavango region and the Caprivi Strip gives you a totally different side of Namibia. Lush, green, and packed with wildlife.
Basically: the route in this itinerary covers some of the big-name favourites, but it’s only a slice of the best places in Namibia. There’s so much more you can add if you’ve got the days.


